ITN906 9314 PT Implementing Subnetted IPv6 Addressing
There is document - ITN906 9314 PT Implementing Subnetted IPv6 Addressing available here for reading and downloading. Use the download button below or simple online reader.
The file extension - PDF and ranks to the Documents category.

322
views
Tags
Related
Comments
Log in to leave a message!
Description
Download ITN906 9314 PT Implementing Subnetted IPv6 Addressing
Transcripts
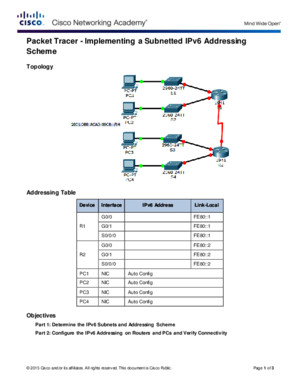
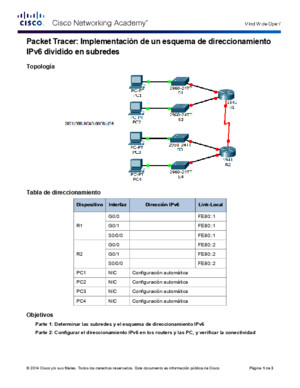
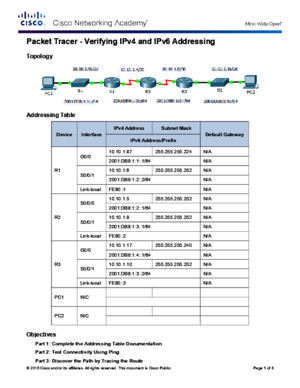
CENT 140 ITN906 I MPLEMENTING IP V 6 S UBNETS N AME : _____________________ ITN906_9314_PT_Implementing Subnetted IPv6 Addressingdocx Honolulu Community College © 2013 Cisco and/or its affiliates All rights reserved This document is Cisco Public Page 1 of 2 Packet Tracer - Implementing a Subnetted IPv6 Addressing Scheme Topology Addressing Table Device Interface IPv6 Address Link-Local R1 G0/0 FE80::1 G0/1 FE80::1 S0/0/0 FE80::1 R2 G0/0 FE80::2 G0/1 FE80::2 S0/0/0 FE80::2 PC1 NIC Auto Config PC2 NIC Auto Config PC3 NIC Auto Config PC4 NIC Auto Config Objectives Part 1: Determine the IPv6 Subnets and Addressing Scheme Part 2: Configure the IPv6 Addressing on Routers and PCs and Verify Connectivity Packet Tracer - Implementing a Subnetted IPv6 Addressing Scheme ITN906_9314_PT_Implementing Subnetted IPv6 Addressingdocx Honolulu Community College © 2013 Cisco and/or its affiliates All rights reserved This document is Cisco Public Page 2 of 2 Scenario Your network administrator wants you to assign five /64 IPv6 subnets to the network shown in the topology Your job is to determine the IPv6 subnets, assign IPv6 addresses to the routers, and set the PCs to automatically receive IPv6 addressing Your final step is to verify connectivity between IPv6 hosts Part 1: Determine the IPv6 Subnets and Addressing Scheme Step 1: Determine the number of subnets needed Start with the IPv6 subnet 2001:DB8:ACAD:00C8::/64 and assign it to the R1 LAN attached to GigabitEthernet 0/0, as shown in the Subnet Table For the rest of the IPv6 subnets, increment the 2001:DB8:ACAD:00C8::/64 subnet address by 1 and complete the Subnet Table with the IPv6 subnet addresses Subnet Table Subnet Description Subnet Address R1 G0/0 LAN 2001:DB8:ACAD:00C8::0/64 R1 G0/1 LAN R2 G0/0 LAN R2 G0/1 LAN WAN Link Step 2: Assign IPv6 addressing to the routers a Assign the first IPv6 addresses to R1 for the two LAN links and the WAN link b Assign the first IPv6 addresses to R2 for the two LANs Assign the second IPv6 address for the WAN link c Document the IPv6 addressing scheme in the Addressing Table Part 2: Configure and Verifty IPv6 Addressing on Routers and PCs Step 1: Configure the routers with IPv6 addressing Note: This network is already configured with some IPv6 commands that are covered in a later course At this point in your studies, you only need to know how to configure IPv6 address on an interface Configure R1 and R2 with the IPv6 addresses you specified in the Addressing Table and activate the interfaces Router(config-if)# ipv6 address ipv6-address/prefix Router(config-if)# ipv6 address ipv6-link-local link-local Step 2: Configure the PCs to automatically receive IPv6 addressing Configure the four PCs for autoconfiguration Each should then automatically receive full IPv6 addresses from the routers Step 3: Verify connectivity between the PCs Each PC should be able to ping the other PCs and the routers
Recommended